Monday, August 19, 2013
Vote for me Elsiecake!
Here is a larger version of the photo I just submitted for the H&M personal style contest,
minus the Instagram filter :)
Sunday, August 4, 2013
Fun Project: Glitter Banners!
I thought of making a glitter banner because my sister is having a baby shower and the party needed some festive decorations. I love working with glitter. It makes everything bright and sparkly and fun! I think the project turned out really well and I want to do more banners in the future using different color glitters!
To do this project you will need the following:
1. Thin Cardboard 8.5x11 (Like a cereal box)
2. Letters printed out on 8.5x11 paper, 700 to 800 pts, any font, up to 2 letters per page
3. Spraymount
4. Exacto knife or blade
5. Glitter (I used Martha Stewart brand)
6. Paint Brush
7. Mod Podge or glue
8. Yarn or thick string
9. Scissors
10. A folder or a folded piece of scratch paper 8.5x11 or larger
11. Masking tape or scotch tape
I didn't get a chance to get the very first steps photographed, but they are the easiest to do!
First you need to spray mount your printed letters to the cardboard. Cut the letters out with scissors once the paper has bonded to the cardboard.
Once you have cut out the letters, you will need to take your exacto knife or razor blade and cut out any extra white paper on the inside of the letter (for example the letter A will still have white space on the inside to cut out)

Once the white space inside the letters are carefully cut out, use your paint brush to coat your entire letter with your glue or Mod Podge. (Finished example below). Only a thin layer of glue will be enough.

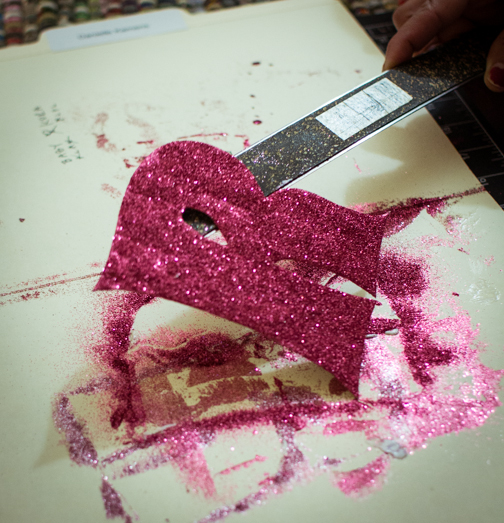
Once you have coated the letter with glue, you can sprinkle on the glitter! Remember to put a sheet of folded paper under your letters to catch the excess glitter.

Once the glitter has coated the entire letter, return the excess glitter to it's container for later use.

Repeat these steps the desired amount of times to create all of the letters that you will use in your banner. (I did it 9 times for my banner.)
Allow banner letters to dry overnight. The next day, put another coat of Mod Podge on top of the glitter with dabbing motions. If you don't have Mod Podge, be sure to use a glue that dries clear. This helps really well to seal in the glitter so it doesn't come off of the letters. If the letters curl a little, try putting them under a heavy book for an extra night after they have completely dried.
When the letters have dried and are flat as can be, there is nothing more to do than attach the string to the back of them. I literally just eyeballed about a quarter inch down from the top of each letter, and masking taped the string so that the tape was hidden from the front view. I also Mod Podged the string over the masking tape for extra hold. I am sure there is a cleaner way to do this. Maybe clear tape would work better. Or perhaps you can crazy glue pieces of straw to the back of the letters and insert the yarn through there. I'll have to try that next time. Anyway, I would leave about 4 feet of yarn slack on either side for hanging the banner up.
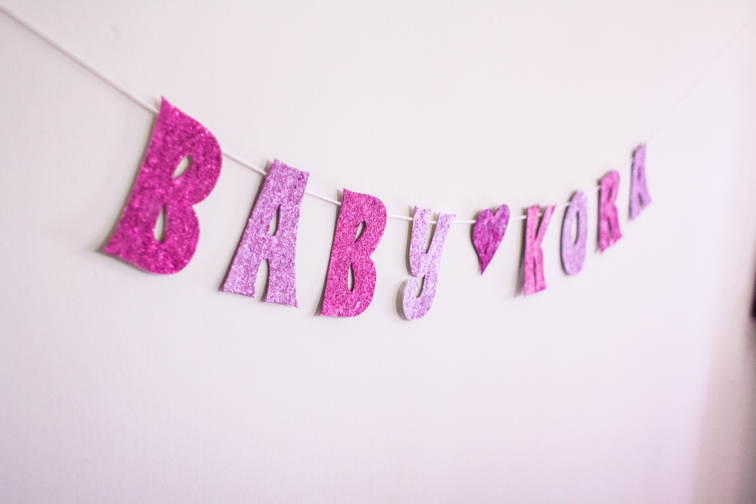
Here's what it looks like done. I'll be using it for my sister's baby shower next week! (hopefully I will have photos to post for that too.)
To do this project you will need the following:
1. Thin Cardboard 8.5x11 (Like a cereal box)
2. Letters printed out on 8.5x11 paper, 700 to 800 pts, any font, up to 2 letters per page
3. Spraymount
4. Exacto knife or blade
5. Glitter (I used Martha Stewart brand)
6. Paint Brush
7. Mod Podge or glue
8. Yarn or thick string
9. Scissors
10. A folder or a folded piece of scratch paper 8.5x11 or larger
11. Masking tape or scotch tape
First you need to spray mount your printed letters to the cardboard. Cut the letters out with scissors once the paper has bonded to the cardboard.
Once you have cut out the letters, you will need to take your exacto knife or razor blade and cut out any extra white paper on the inside of the letter (for example the letter A will still have white space on the inside to cut out)

Once the white space inside the letters are carefully cut out, use your paint brush to coat your entire letter with your glue or Mod Podge. (Finished example below). Only a thin layer of glue will be enough.

Once you have coated the letter with glue, you can sprinkle on the glitter! Remember to put a sheet of folded paper under your letters to catch the excess glitter.

Once the glitter has coated the entire letter, return the excess glitter to it's container for later use.

Repeat these steps the desired amount of times to create all of the letters that you will use in your banner. (I did it 9 times for my banner.)
Allow banner letters to dry overnight. The next day, put another coat of Mod Podge on top of the glitter with dabbing motions. If you don't have Mod Podge, be sure to use a glue that dries clear. This helps really well to seal in the glitter so it doesn't come off of the letters. If the letters curl a little, try putting them under a heavy book for an extra night after they have completely dried.
When the letters have dried and are flat as can be, there is nothing more to do than attach the string to the back of them. I literally just eyeballed about a quarter inch down from the top of each letter, and masking taped the string so that the tape was hidden from the front view. I also Mod Podged the string over the masking tape for extra hold. I am sure there is a cleaner way to do this. Maybe clear tape would work better. Or perhaps you can crazy glue pieces of straw to the back of the letters and insert the yarn through there. I'll have to try that next time. Anyway, I would leave about 4 feet of yarn slack on either side for hanging the banner up.
Here's what it looks like done. I'll be using it for my sister's baby shower next week! (hopefully I will have photos to post for that too.)
Friday, July 26, 2013
Friday Favorites #2
Hey! Here is some cool stuff that I found this week. What did you find? Happy Friday! ![]() |
| These fantastic toilet paper rolls |
![]() |
| This seed baring cigarette |
![]() |
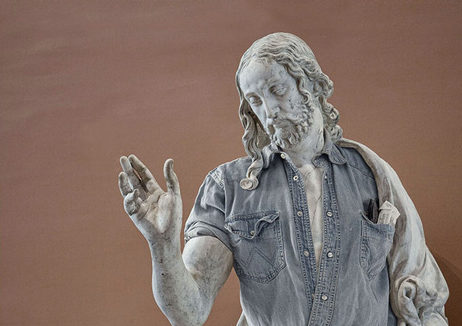
| These hipster Greek Statues |
Monday, July 15, 2013
Aviation Submission Roundup
My friend Alyson and I LOVE Portland, Oregon, and we also LOVE cocktails, so entering the Aviation Gin photo contest seemed like a no brainer!! We were hoping so bad to win a trip to "The city of roses", and to tour the Aviation Gin facility, but sadly we were not the ones randomly selected in the drawing. We were however, given a couple of honorable mentions on the Aviation blog! Anyhow, we ended up with some pretty interesting photos for their contest, and here they are all in one place.
(Thank you Brian R. for being present at every one of these shoots, and offering your equipment, skill, and advice!)
Some things about the photos-
Photo 1: I shot the bottle against a pink background and thought it needed something else, so I added a gradient and some circles in Photoshop. I also got this thing called a "fry cup" at a restaurant supply store and added those colorful circles to it on Photoshop. Its pretty much impossible to find snow cone cups anywhere, especially on short notice. There was a lot of color tweaking in this photo. I enhanced the snow cone color, and the color of my my hand. I really did make a snow cone for this competition. This particular snow cone was cantaloupe, habanero and orange syrup. The original idea for this photo was to have three hands and three snow cones of different colors, and I really did make the syrup for all three flavors, but I ran out of time, so I had to improvise with using only one flavor.
Photo 2: I love the way this one turned out. We pretty much stuck with the original idea of this photo, "50s slumber party"-the only real change we made was that we used color instead of making it in black & white. This photo kind of came together miraculously. All of these pretty girls just happened to be free that day, and on a whim, I asked Hannah if she had a vintage hand held mirror and brush, and alas, she did! I think it really enhanced the picture. The only thing I would change is that I would take Dorian's watch off. I totally missed that one!!
Photo 3: I felt kinda lost on this photo, but had fun hanging with my girl Hazel. I bought clothes from Forever 21 (word to the wise, they do not do returns for a refund! ouch!) I made the best looking Spicy Red Snapper EVER (equivalent of a Bloody Mary). It had a whole frekin' breakfast as a garnish: (veggie) Sausage, silver dollar pancakes, TATER TOTS, a hard boiled egg, celery, jalapeƱo, and habanero. It looked like a million bucks. I should have gotten a closer shot. The scene is supposed to be a club or bar scene, with two people who are opposites, but are united by their gin drinks. The drinks they have chosen define their personality, as opposed to how they are dressed.
Photo 4: This was the first photo that we took for the competition. I already have it somewhere on this blog. I had to eat SO MANY (veggie) HOT DOGS for this damn photo shoot. I will never eat another hot dog again, ever. The burger was also vegetarian, and I think Alyson was sick of them by the end of it too. It was really fun to have her and her roommate Scott over to do this shoot though, even if we did get sick of BBQ foods.
Photo 5: I had a lot of fun hanging out at the park at night doing this shoot. Aly jumped off of this ledge so many times! It must have gotten really hot in that leather jacket and that hat. We were at this park in Mid-City Los Angeles at around 10pm at night and there were still children playing in it! We left around 11:30, and I remember seeing this couple pushing a kid on a swing that must have been no older than 2. I guess there is a whole night park culture that I knew nothing about. I had to Photoshop some of the water back in, because it got cut off!!
Anyway, hope you like these pics.
(Thank you Brian R. for being present at every one of these shoots, and offering your equipment, skill, and advice!)
Some things about the photos-
Photo 1: I shot the bottle against a pink background and thought it needed something else, so I added a gradient and some circles in Photoshop. I also got this thing called a "fry cup" at a restaurant supply store and added those colorful circles to it on Photoshop. Its pretty much impossible to find snow cone cups anywhere, especially on short notice. There was a lot of color tweaking in this photo. I enhanced the snow cone color, and the color of my my hand. I really did make a snow cone for this competition. This particular snow cone was cantaloupe, habanero and orange syrup. The original idea for this photo was to have three hands and three snow cones of different colors, and I really did make the syrup for all three flavors, but I ran out of time, so I had to improvise with using only one flavor.
Photo 2: I love the way this one turned out. We pretty much stuck with the original idea of this photo, "50s slumber party"-the only real change we made was that we used color instead of making it in black & white. This photo kind of came together miraculously. All of these pretty girls just happened to be free that day, and on a whim, I asked Hannah if she had a vintage hand held mirror and brush, and alas, she did! I think it really enhanced the picture. The only thing I would change is that I would take Dorian's watch off. I totally missed that one!!
Photo 3: I felt kinda lost on this photo, but had fun hanging with my girl Hazel. I bought clothes from Forever 21 (word to the wise, they do not do returns for a refund! ouch!) I made the best looking Spicy Red Snapper EVER (equivalent of a Bloody Mary). It had a whole frekin' breakfast as a garnish: (veggie) Sausage, silver dollar pancakes, TATER TOTS, a hard boiled egg, celery, jalapeƱo, and habanero. It looked like a million bucks. I should have gotten a closer shot. The scene is supposed to be a club or bar scene, with two people who are opposites, but are united by their gin drinks. The drinks they have chosen define their personality, as opposed to how they are dressed.
Photo 4: This was the first photo that we took for the competition. I already have it somewhere on this blog. I had to eat SO MANY (veggie) HOT DOGS for this damn photo shoot. I will never eat another hot dog again, ever. The burger was also vegetarian, and I think Alyson was sick of them by the end of it too. It was really fun to have her and her roommate Scott over to do this shoot though, even if we did get sick of BBQ foods.
Photo 5: I had a lot of fun hanging out at the park at night doing this shoot. Aly jumped off of this ledge so many times! It must have gotten really hot in that leather jacket and that hat. We were at this park in Mid-City Los Angeles at around 10pm at night and there were still children playing in it! We left around 11:30, and I remember seeing this couple pushing a kid on a swing that must have been no older than 2. I guess there is a whole night park culture that I knew nothing about. I had to Photoshop some of the water back in, because it got cut off!!
Anyway, hope you like these pics.
Tuesday, May 28, 2013
Workin' It
I've been so busy taking photographs! Here is a recent project I did where I collaborated with the beautiful and talented Alyson, her roommate Scott, and my super awesome boyfriend Brian. This is for a contest. I wanted it to have a magazine booze ad vibe. I hope you like it :)
Art Direction: Danielle
Theme Concept: Alyson
Photo Assistant: Scott
Photographer: Brian
Art Direction: Danielle
Theme Concept: Alyson
Photo Assistant: Scott
Photographer: Brian
Side note: As it turns out, it is really hard to make two people look good in a photo at the same time. You just can't control it. One person may be blinking while the other person looks fabulous, or one person may be doing something weird with their mouth while another person can be having a wardrobe malfunction...Really, anything can happen. This was the case for this photo shoot. This is actually two different photos 'shopped together. Aly looked great, but I just didn't have the right look, so I sifted through the other photos in hopes that I could find one of myself giving off the same vibe that Aly was, and at the same time not looking too shabby. Lo and behold I found it!
Another problem with the photo was that the hot dog that I was holding in the "good" picture of myself wasn't hot-doggie enough. You could only see part of the sad small bun, so I found another photo where I was holding the dog with all of it's mustard and ketchupy goodness, and I used a layer mask to throw it into the photo. Hopefully you can't tell that any of this was actually photoshopped ;)
Before photos (pre Photoshop)- Notice the sad sad hotdog in my hand
Subscribe to:
Posts (Atom)