Sunday, October 20, 2013

How to make your very own PEPPERMINT BUTLER!

For those of you who are not familiar, Peppermint Butler is the loyal butler to Princess Bubblegum in the popular series Adventure Time.  The show has a bunch of great characters, so I thought it would be fun to dress up as Princess Bubblegum for Halloween. After working on the dress and the crown for my costume, I got the idea to create a Peppermint Butler purse.  I'm going to fill it with bubblegum and peppermints :)

It was a bit time consuming, but still really easy to make dear old Pepp.  What takes time is waiting for all of that glue to dry ;)

The first thing you need to do is draw a circle.  You can really make your Butler any size.  Mine was about 8 inches in diameter.  Cut out about 4 circles of the same diameter using regular printer paper.


Now, use a cereal box or some sort of flimsy cardboard, take the circle you cut out from printer paper and trace it over your cardboard, and cut a circle out of the cardboard.  Do this two times.


Next up, cut out two more pieces of cardboard as pictured below, it can be any width.  I chose 3.5 inches.  It worked out pretty nicely as far as peppermint proportions go...


Tape the two pieces together.


Little by little, start taping your long straight piece to your cardboard circle. Tape the inside too for extra support...


If you desire, you can line the inside of your purse.  I had some purple felt left over from making the Princess' lapels so that is what I chose to use.  you can line it with any color, really...


After it is all lined, finish taping both sides of the box...

`
Before the felt goes on, you're going to cover the cardboard with those white printer paper circles you made earlier.  That way, the cardboard and tape and ugly stuff doesn't show through...

Below you see I've applied the felt to the front and the paper to the sides.  The glue is on top there and I'm just about to put the felt on top...(P.S. use this glue, it is AWESOME)

After that you slowly start bringing him to life using different color felts.  Its helpful to have those extra cut outs of the printer paper so that you can measure how wide to make his clothes and so on...


His arms and legs were a bit tricky.  to make them, I rolled a piece of felt up with a wire I got from a craft store.  In other words, there is a wire in his legs and arms so you can bend them. I sewed the felt up and added the cuffs on the end to hide the imperfections.  

I made his hands and feet the same way...  I will tell you how I did the hand so you get the idea...I drew a 1 dimensional hand on felt and cut that pattern out 4 times.  I sewed two of the pieces together and stuffed them with left over felt to give it some dimension.  I placed the hands into the cuffs and using white thread, sewed the unseen part of the hand into the white cuff.  You can't really see it and it keeps the hand on the arm really well.  You basically use the same idea for the feet except that the feet go over the leg and you use red thread to sew it to the leg...


So, for those of you wondering how I attached the appendages onto the body, I'll tell ya.  I sewed the arms and legs into the cardboard! It wasn't all that easy.  You are basically blindly trying to find the perfect spot for your needle to go, and it takes a couple of times to get it right.  On top of that, pushing a needle through cardboard, albiet flimsy cardboard, HURTS yo' fingas!  Be sure to have a thimble handy to protect those digits...

Here is the finished product...My Peppermint Butler glamour shoot!


Ahh! Cat hair on his feets!

Kinda need to do some last minute glue touch ups, but I ran out of glue!!


UPDATE:   I got some cord from a fabric store and put two holes at the top and turn Mr. Butler into a purse! That way he will always be at my side ;)  Here is a photo of me in my halloween costume with my butler purse!!


Monday, October 7, 2013

Screen Door

Have you ever been to that restaurant in Portland called Screen Door?  That is what this post title reminds me of.  You can get so much fried chicken there, it is nothing short of amazing!  That's not the kind of screen door I'm talking about right now though.  The one I'm talking about just made my apartment feel more like home.  I made a screen door!  Now my cat can't escape when I want to leave the door open!  I've been waiting for my screen door for months, and I finally had time to do it :)

Here is a quick picture tutorial on how to make one yourself.  You will definitely need at least two people to do it.

Here is what you need:

5 pieces of wood
A drill and drill bits
Measuring tape
Clamps
A Ruler
A razor blade
Long screws, depending on how thick your wood is (I think our screws were around 3")
Other regular screws
A hand saw
Screen material
at least 2 hinges
an eyelet latch
a handle
a friend

The very first thing you need to do is measure your door frame where your screen will go.  Ours measured something like 80.5" x 36"

Then you will need to measure the wood pieces


We measured two long pieces and two short pieces.  All together your frame will have 4 pieces of wood.  Later you will add 1 more piece somewhere in the middle as a support.  We'll get to that in a minute!


Then we clamped our wood down to our coffee table (limited work space here!!)


We used the razor blade to make a measuring mark on where we wanted to cut the wood.


Annnnd SAW!!  When sawing it is best to "let the saw do the work." Just  rock the saw back and forth gently and it will cut through the wood super easy.  Be sure to have a vacuum handy because there will be sawdust!


Fix your beard and continue...


Drill two holes (for extra support) where you want your screws to go.  This depends on the width of your wood.  Our width was pretty thick so we had to drill through the wood as much as possible so that the screw would actually attach to the smaller piece.  Make sure the drill bit that you use to drill holes in the wood is slightly larger than the head of the screw that you are using.


Clamp the two pieces together and get ready to screw them together!


We got super cute blue screws at the hardware store.  They aren't meant for wood but they still work and they were super long!


We got pretty excited about making the skeleton of the screen door and we decided to test it out in the door frame...


It fits!


After all the excitement we added the support piece in the middle.  Make sure to place the support piece  lower or higher than the door knob to your main door!

We then added screen material to what we considered to be "the back of the door"  and we used a staple gun to fix it to the wood.  I stood on the wood while Brian pulled it SUPER taut.  The long side took about 10 staples, while the short side took about 5.  We didn't staple gun the support piece.


When we were done staple gunning the screen material, we used a ruler and the razor blade to cut off the excess material.  Ow on your knees if you have a hard wood floor!  Oh well.  It took about 8 minutes to do this.


Finally you add the hinges, about 10-12 inches down from the top and bottom of the door.  The short side of the hinge is affixed to the wood, while the long side is affixed to the door frame outside.  Make sure you know which way you want your door to open!!


This is the hinge after we fastened it to the door.


We also wanted the screen to lock from the inside, so we bought this eyelet hook piece.  The hook screws into the door frame, and the eyelet screws into the screen.  We put the lock at the same length as our support beam.  I guess you could put the lock wherever you want, though...


Lastly we added the door handle.  I think the handle is meant for drawers and stuff.  I liked the flower pattern and it was on clearance.  Perfect!

Here is our little country screen door all finished...


****NOTE:  Be sure to subtract the space that the hinge will take up in the door frame when you are measuring the short side of your wood.  I'd say it takes up about 3/16".


P.S. Screen Door Portland.  I want it!


Monday, August 19, 2013

Vote for me Elsiecake!


Here is a larger version of the photo I just submitted for the H&M personal style contest,
minus the Instagram filter :)


Sunday, August 4, 2013

Fun Project: Glitter Banners!

I thought of making a glitter banner because my sister is having a baby shower and the party needed some festive decorations.  I love working with glitter.  It makes everything bright and sparkly and fun!  I think the project turned out really well and I want to do more banners in the future using different color glitters!

To do this project you will need the following:

1. Thin Cardboard 8.5x11 (Like a cereal box)
2. Letters printed out on 8.5x11 paper,  700 to 800 pts, any font, up to 2 letters per page
3. Spraymount
4. Exacto knife or blade
5. Glitter (I used Martha Stewart brand)
6. Paint Brush
7. Mod Podge or glue
8. Yarn or thick string
9. Scissors
10. A folder or a folded piece of scratch paper 8.5x11 or larger
11. Masking tape or scotch tape


I didn't get a chance to get the very first steps photographed, but they are the easiest to do!

First you need to spray mount your printed letters to the cardboard.  Cut the letters out with scissors once the paper has bonded to the cardboard.

Once you have cut out the letters, you will need to take your exacto knife or razor blade and cut out any extra white paper on the inside of the letter (for example the letter A will still have white space on the inside to cut out)


Once the white space inside the letters are carefully cut out,  use your paint brush to coat your entire letter with your glue or Mod Podge. (Finished example below). Only a thin layer of glue will be enough.


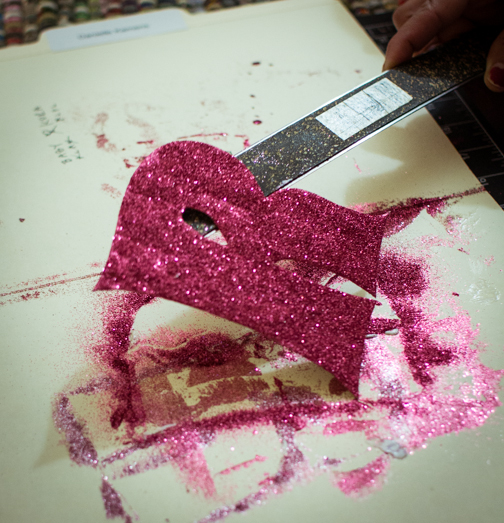
Once you have coated the letter with glue, you can sprinkle on the glitter!  Remember to put a sheet of folded paper under your letters to catch the excess glitter.


Once the glitter has coated the entire letter, return the excess glitter to it's container for later use.


Repeat these steps the desired amount of times to create all of the letters that you will use in your banner. (I did it 9 times for my banner.)

Allow banner letters to dry overnight.  The next day, put another coat of Mod Podge on top of the glitter with dabbing motions.  If you don't have Mod Podge, be sure to use a glue that dries clear.  This helps really well to seal in the glitter so it doesn't come off of the letters.  If the letters curl a little, try putting them under a heavy book for an extra night after they have completely dried.


When the letters have dried and are flat as can be, there is nothing more to do than attach the string to the back of them.  I literally just eyeballed about a quarter inch down from the top of each letter, and masking taped the string so that the tape was hidden from the front view.  I also Mod Podged the string over the masking tape for extra hold.  I am sure there is a cleaner way to do this.  Maybe clear tape would work better. Or perhaps you can crazy glue pieces of straw to the back of the letters and insert the yarn through there.  I'll have to try that next time.  Anyway, I would leave about 4 feet of yarn slack on either side for hanging the banner up.

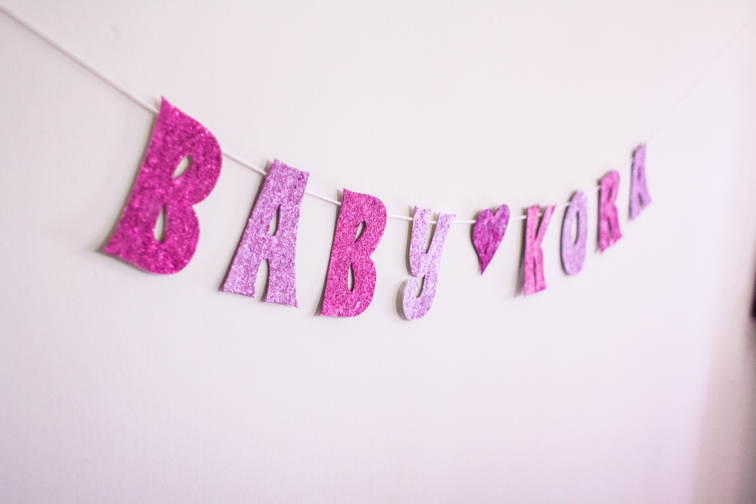
Here's what it looks like done.  I'll be using it for my sister's baby shower next week!  (hopefully I will have photos to post for that too.)